|TUTO| TXD'WorkShop - PhotoFiltre
+19
Jayce Collins
Roscoe VIII
Amaru Levinston
Lionel_Sondarez
Carlos Dolto
Damien_Lelohier
Barry_Houston
Matthew Preston
N.W.A
Dave_Vuitton
Francesco[Major]Callogero
GBA
Edward Fulton [Wag]
Warren Johson
\Leave/
Nelly Waltz
Max_Dilomen
Terrence Reeves
James_Worldrom
23 participants
Forum CeMondeLeVotre Rôleplay — GTA:SAMP :: COMMUNAUTE: DISCUSSIONS DIVERSES :: Modding - Gta San Andreas :: Autres
Page 1 sur 2
Page 1 sur 2 • 1, 2 
 |TUTO| TXD'WorkShop - PhotoFiltre
Dans ce tutoriel nous allons apprendre quelque chose de simple :
Pour commencer nous allons vous emparez du logiciel TXD WorkShop ainsi que de PhotoFiltre.L'edition d'un fichier TXD.
Cliquez ici, puis cliquez sur l'image

pour telecharger TXD WorkShop.
Cliquez ici pour telecharger PhotoFiltre.
D'abord, nous allons etudier la fonction de chaque bouton

Open IMG : Ouvrir un fichier IMG
Open TXD : Ouvrir un fichier TXD
Save TXD : Sauvegarder un fichier DFF
Import : Importer une image
Export : Exporter une image
Flip : Renverser l'image
Fleches : Monter - Descendre l'image
Properties : Propriétés
Commencons la modification :
Cliquez sur le bouton Open TXD

Cliquez sur l'image que vous souhaitez modifier si il y en a plusieurs.

Cliquez sur Export

Ouvrez Photofiltre.Cliquez sur Ouvrir.
- Spoiler:

- Spoiler:

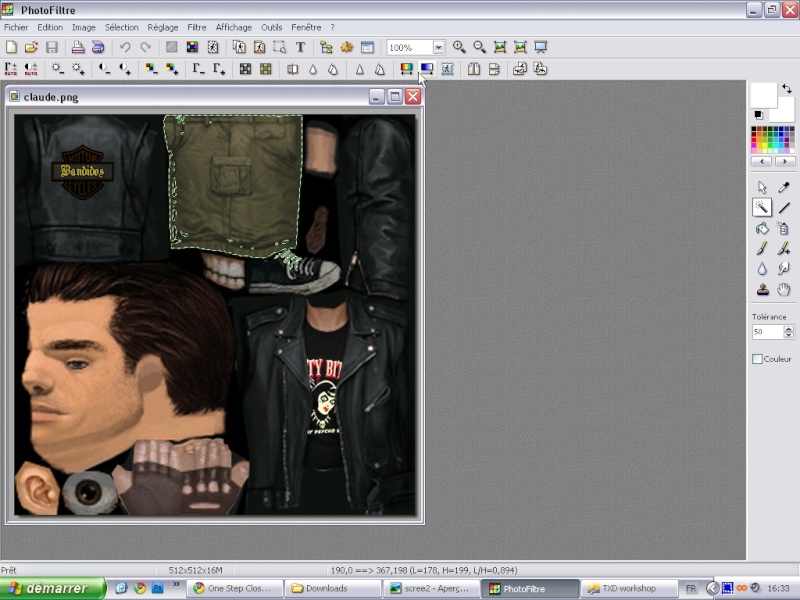
Dans ce tutoriel nous allons apprendre à modifier la couleur d'un vêtement via PhotoFiltre, cependant ce n'est pas la seule utilité de ce logiciel et vous pouvez en utiliser un autre.
Cliquez sur l'outil baguette magique qui sur mon Screen est sélectionné, dans la barre à droite.
(Ici nous modifions un Pantalon)
Reglez la tolerance de maniére à ce que tout le vetement ou presque soit selectionné.
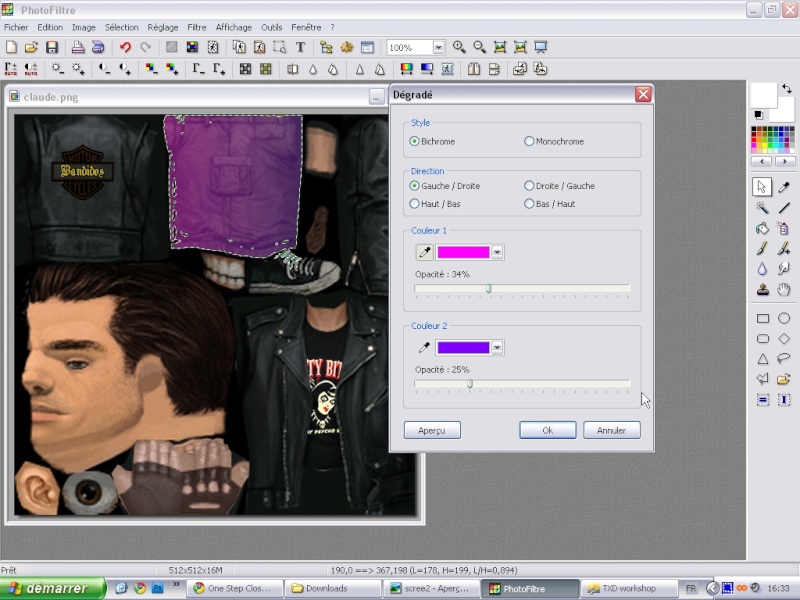
- Spoiler:

(Ici nous cliquons sur le bouton de Droite)
- Spoiler:

- Spoiler:

Maintenant sauvegardez votre image au format BMP ou PNG.
Retournez dans TXD WorkShop, selectionnez l'image à remplacer puis cliquez sur Import.

Recommencez l'operation si vous avez autre chose à modifier, quand tout est fait cliquez sur Save TXD.

* Avec le Logiciel TXD WorkShop seul les textures sont modifiables.
* Je vous conseille PhotoShop pour modifier les TXD.
* Si vous avez des questions posez les, je ne répond pas aux SMS.
Tuto By Luigi
Invité- Invité
 Re: |TUTO| TXD'WorkShop - PhotoFiltre
Jolie, et pour ajouter des bandannas ou des casquettes etc on utilise quoi?
Ca serait bien un tuto pour ça.
Ca serait bien un tuto pour ça.

James_Worldrom- Messages : 3605
Date d'inscription : 20/09/2009
Age : 29
 Re: |TUTO| TXD'WorkShop - PhotoFiltre
Quand j'aurais du temps je le ferait, surement dans la semaine mais il faut 3DSMAX
Invité- Invité
 Re: |TUTO| TXD'WorkShop - PhotoFiltre
Je suis encore un peu perdu pour les couleurs sur Photofiltre.

Terrence Reeves- Messages : 4107
Date d'inscription : 01/10/2009
Age : 29
Ancien Prenom_Nom : Lutcho
 Re: |TUTO| TXD'WorkShop - PhotoFiltre
je ferais un tuto pour les debut sur toshop/tofiltre
Invité- Invité

Max_Dilomen- Messages : 80
Date d'inscription : 01/01/2010
Age : 32
 Re: |TUTO| TXD'WorkShop - PhotoFiltre
De rien, pas mal demandait un tuto, en esperant les voir aidé.
Invité- Invité
 Re: |TUTO| TXD'WorkShop - PhotoFiltre
Merci pour le tuto, jy arrive grâce a Terrel, c'est pas vraiment compliquez faut juste l'utilisez assez souvent & voilà ( sinon faut que je me mètte a Photoshop si tu pouvais faire un tuto avec ce logiciel )
Dernière édition par A∂en_Slavin [Cosmo] le Mer 17 Fév - 10:40, édité 1 fois

Nelly Waltz- Messages : 1749
Date d'inscription : 23/02/2009
Age : 32
Ancien Prenom_Nom : Aden Slavin
 Re: |TUTO| TXD'WorkShop - PhotoFiltre
Je vais essayer, mais PhotoShop, 3DSMAX etc..C'est des logiciels que tu apprend à utiliser seul en les decouvrant donc c'est chaud un tuto..
Invité- Invité
 Re: |TUTO| TXD'WorkShop - PhotoFiltre
luigi si tu fait un tuto de 3dsmax sa serais vraiment TROP BIEN
parceque je l'est moi mais je ne pige ABSOLUMENT RIEN --'
parceque je l'est moi mais je ne pige ABSOLUMENT RIEN --'
\Leave/- Messages : 241
Date d'inscription : 30/06/2009
 Re: |TUTO| TXD'WorkShop - PhotoFiltre
A∂en_Slavin [Cosmo] a écrit:Merci pour le tuto, jy arrive grâce a willy, c'est pas vraiment compliquez faut juste l'utilisez assez souvent & voilà ( sinon faut que je me mètte a Photoshop si tu pouvais faire un tuto avec ce logiciel )
omg tu confond moi et Willy...
Warren Johson- Messages : 6394
Date d'inscription : 29/04/2009
 Re: |TUTO| TXD'WorkShop - PhotoFiltre
Ouais voilà c'est terrel, désoler lol.
Edit : Jarrive a utiliser Photoshop CS4 , il est largement mieux que Photofiltre
Edit : Jarrive a utiliser Photoshop CS4 , il est largement mieux que Photofiltre

Nelly Waltz- Messages : 1749
Date d'inscription : 23/02/2009
Age : 32
Ancien Prenom_Nom : Aden Slavin
 Re: |TUTO| TXD'WorkShop - PhotoFiltre
Humm, j'ai pas compris quand tu commence à mettre la tolérance..
![Edward Fulton [Wag]](https://2img.net/h/03.mgl.skyrock.com/small.29639273.jpg)
Edward Fulton [Wag]- Messages : 731
Date d'inscription : 20/02/2009
 Re: |TUTO| TXD'WorkShop - PhotoFiltre
Quand j'modif une couleur etc.. après je le sauvegarde et j'importe le png après etc..
Je sauvegarde etc.. J'met avec imgtool, après j'commence a me co, sa me fait crash direct...
C'est quoi le problème?
Je sauvegarde etc.. J'met avec imgtool, après j'commence a me co, sa me fait crash direct...
C'est quoi le problème?

GBA- Messages : 1105
Date d'inscription : 02/03/2009
 Re: |TUTO| TXD'WorkShop - PhotoFiltre
Merci , les tutos que j'avais demander ^^ . Pour 3Ds Max je me débrouille .
Mais pas trop en .TXD Merci .
Mais pas trop en .TXD Merci .
![Francesco[Major]Callogero](https://2img.net/u/1314/14/51/03/avatars/3437-28.jpg)
Francesco[Major]Callogero- Messages : 1093
Date d'inscription : 09/01/2010
 Re: |TUTO| TXD'WorkShop - PhotoFiltre
3ds max + dur que TXD
\Leave/- Messages : 241
Date d'inscription : 30/06/2009
 Re: |TUTO| TXD'WorkShop - PhotoFiltre
Elodie_Alvarez [Leez] a écrit:3ds max + dur que TXD
Ouais , mais plus important car sa permet de placer les Texture sur le personnage en 3D .
J'y arrive , le problème est que je n'arrive pas à prendre que les chaussure ou la seule tête .
![Francesco[Major]Callogero](https://2img.net/u/1314/14/51/03/avatars/3437-28.jpg)
Francesco[Major]Callogero- Messages : 1093
Date d'inscription : 09/01/2010
 Re: |TUTO| TXD'WorkShop - PhotoFiltre
moi je n'arrive a rien faire du tous je trouve sa trop dure il me faudrait un bon tuto... luigi ? 
\Leave/- Messages : 241
Date d'inscription : 30/06/2009
 Re: |TUTO| TXD'WorkShop - PhotoFiltre
Tient un tuto en Anglais faudrait l'améliorer et le faire en Français je vais essayer ^^ .
Je n'arrive pas le 4 mais je réessaye avec un autre Skin .
Luigi Corleone a écrit:Fait ce genre de demande partie Modding, et apprend à te servir du bouton
Merci car regarde ce que tu aurait trouvé :Koby_Wesker a écrit:Carl_Kennedy [C-Killah'] a écrit:Tummy a écrit:
Tutorial: How to attach objects to peds in 3ds Max
This tutorial will show you how to attach an object to a pedestrian using 3dx Max 8, in this case I’ve chosen to attach a bandana to a ped.
Note: There are probably hundreds of different ways to do this on, this is my way.
Tools you need before you start:
- 3ds Max with Kam’s Scripts
- IMG Tool
- TXD Workshop
First off, you need to have your ped’s .dff and .txd, and your object’s .dff and .txd ready. In this case my ped is bmycr (http://wiki.sa-mp.com/w/images/c/ca/Skin_21.png), my object being bandmask from player.img.
Note: Always remember to take backups, one mistake may ruin it all.
If you’re unsure about what your ped is called, look it up here:
http://wiki.sa-mp.com/wiki/Skins
The following steps will show you how to export a model/ped from gta3.img and player.img using IMG Tool, if you already have your ped’s .dff and .txd, proceed to step 5.
1. Open IMG Tool and press CTRL + L
2. Choose GTA3.img from the browser and click open, this is where all the peds are (and other models of course), the bandana object I’ve used in this tutorial lays in player.img
3. Hit F2 and type in the name of the ped you want to export, press enter
4. When you’ve found the desired ped, press CTRL + E and extract it to somewhere you know of, remember to extract both the .dff and the .txd
5. Press CTRL + L and choose player.img, here you will find objects that CJ can wear
6. Export any object you like, e.g. a hat, I chose bandmask.dff
7. Find the object’s .txd and extract it (CTRL + E), I chose bandblue.txd
If you’ve kept them organized, it should now look like this:
In the next steps we’ll be starting to use 3ds Max, but before that, you have to make sure that you’ve installed Kam’s Scripts, it’s vital if you wish to continue. Kam’s Scripts can be found here:
http://www.gtaforums.com/index.php?showtopic=218318
…
After you’ve installed Kam’s Scripts, fire up 3ds max and wait for everything to load up. Make sure Kam’s Scripts are activated, how to check this is shown here:
http://www.tummyweb.com/files/3dsmax/2.PNG
If you cannot see Kam’s Scripts under Utilities, go to “MAXScript” from the top and select Run Script, shown here:
http://www.tummyweb.com/files/3dsmax/3.PNG
Enter the startup folder and open GTAScript_Controller from there:
http://www.tummyweb.com/files/3dsmax/4.PNG
When everything above is set, start following the next steps:
Importing the object
1. Click on the Utilities button, it’s shown as a hammer on the right-hand side, under Kam’s GTA Scripts you will see “DFF IO”, click on it, it will open a new window on the left side. Expand the import section by clicking on the +, now select Import DFF. At first we will import the object we want to attach. Locate it and import it.
http://www.tummyweb.com/files/3dsmax/5.PNG
2. Ops! http://www.tummyweb.com/files/3dsmax/6.PNG
Likely, it will prompt you like this and tell you that it has 3 clumps, click Ok and select “Import”, the import button that is above Import DFF.
http://www.tummyweb.com/files/3dsmax/7.PNG
You should now have successfully imported the object, if you can’t see it, click in a route and scroll up, it will zoom into it.
Tip: You can move around in a route by holding down your Mouse 3 button (scroll) and dragging.
As you probably can see, the object came together with a boneset, what we’re going to do now, is to delete it. You do this by pressing CTRL + A to mark everything, then holding CTRL down while clicking on the object (deselecting it). Press delete and the boneset should go away.
You should now have something like this:
http://www.tummyweb.com/files/3dsmax/8.PNG
Texturing the object
3. We’re now going to add a texture to the object, before we start doing that you might want to save your scene (CTRL + S). You can minimize 3ds Max for a little while.
…
Fire up TXD Workshop, I assume you have this already.
A) Click on Open TXD, locate your object’s texture and open it, in my case the texture file is called bandblue.txd, after you’ve done that, it should look something like this:
http://www.tummyweb.com/files/3dsmax/9.PNG
B) Click on export and export the picture in any format you like, I chose to export as .png
Note: If you choose to export as BMP, it might be giving you errors later while importing.
C) Delete the object’s .txd, you won’t be needing it anymore in this tutorial
D) Close the program and move back to 3ds Max
If everything is done right, you should have something like this:
http://www.tummyweb.com/files/3dsmax/10.PNG
…
4. In 3ds Max, select the Select and Move tool with the Rectangular Selection
http://www.tummyweb.com/files/3dsmax/11.PNG (a. being the select and move tool, b. being the rectangular selection, this will allow you to mark “stuff” by drawing a square, there are also other methods of marking/selecting for the Select and Move tool, you can find these by holding down your left mouse button on the button shown in the picture.)
Now draw a square around your object to mark it.
5. Press M and a new window should pop up: http://www.tummyweb.com/files/3dsmax/12.PNG
Click on the small button next to Diffuse Map (in my case the button is called “M”, it’s probably not an M there in your case, if there is, you can right click and select cut), another window should pop up:
http://www.tummyweb.com/files/3dsmax/13.PNG
In this window select Bitmap, double click on it, it will open a browser:
http://www.tummyweb.com/files/3dsmax/14.PNG
Find the image file you exported in step 3 and open it, you should now have something like this:
http://www.tummyweb.com/files/3dsmax/15.PNG
Click on the Assign Material to Selection button and then select Show Map in Viewport:
http://www.tummyweb.com/files/3dsmax/16.PNG
Close the window and look inside the down-right route, it should now be textured:
http://www.tummyweb.com/files/3dsmax/17.PNG
6. Click on the Modify button on the right-hand side and select Vertex under Editable Mesh, now click on the arrow next to where it says Modifier List, select UVW-Map from the drop down border:
http://www.tummyweb.com/files/3dsmax/18.PNG - > http://www.tummyweb.com/files/3dsmax/19.PNG
7. Select Gizmo under UVW Mapping so you can see the options beneath, you may mess around with these options as you like, but be careful. This is what I did: http://www.tummyweb.com/files/3dsmax/20.PNG
Deselect your object by clicking on the Create button, then clicking somewhere in one of the routes:
http://www.tummyweb.com/files/3dsmax/21.PNG
Importing the ped and fitting the object
8. Back to the left side window, tick the A box, this will auto-skin the character on import, now click on Import DFF:
http://www.tummyweb.com/files/3dsmax/22.PNG - http://www.tummyweb.com/files/3dsmax/23.PNG
Find the ped you want to import and click on open, the newly imported ped will show up in the four different routes:
http://www.tummyweb.com/files/3dsmax/24.PNG
It’s likely that you’ll have to rotate the object in place, so it will fit onto the ped, this is how you can do this:
A) Click on the object so you have it selected, select Vertex after clicking on the Modify button:
http://www.tummyweb.com/files/3dsmax/25.PNG
B) We’ll now rotate the object to fit the ped, select the Select and Rotate tool and draw a box around the object to select all the vertices (the vertices are the blue dots that you can see), then rotate by holding down your left mouse button on the utmost circle and dragging (you can also use the other circles for that matter, but this is how I do it)
Repeat the same procedure in the other routes.
http://www.tummyweb.com/files/3dsmax/26.PNG
Outcome: http://www.tummyweb.com/files/3dsmax/27.PNG
C) As you can see, the object is not in place yet, we have to use the Select and Move tool to move it up, click on it. If the vertices are not marked (red means they’re marked), mark them again:
http://www.tummyweb.com/files/3dsmax/28.PNG
Outcome: http://www.tummyweb.com/files/3dsmax/29.PNG
As you can see, the object is inside the ped’s face, to fix this you will have to move vertices alone, this can be tricky in the beginning, but you will manage it eventually. Just remember to save your project regularly and do backups before you perform difficult moves.
Tip: You can also use the Select and Uniform Scale tool to change the size of the object:
http://www.tummyweb.com/files/3dsmax/30.PNG
When you’ve placed the object correctly, and when you’re satisfied with it, proceed to step 9.
Attaching the object to the ped
9. You’re now going to attach the object to the ped, be careful, you’re attaching an object to a ped, not attaching a ped to an object. It’s VERY important that you don’t attach your ped to your object, save your scene before you follow these steps.
A) Deselect your object by clicking on the Create button and clicking in a route:
http://www.tummyweb.com/files/3dsmax/31.PNG
B) Select the ped by clicking on it, go to the Modify section by clicking on the Modify button. Choose vertex, a little longer down you’ll see an Attach button, after clicking on it, click on your object. It will prompt you, press Ok:
http://www.tummyweb.com/files/3dsmax/32.PNG
http://www.tummyweb.com/files/3dsmax/33.PNG
http://www.tummyweb.com/files/3dsmax/34.PNG
Your object is attached to the ped, now we’ll have to check if the object’s vertices were correctly assigned to the head bone, click on the + next to where it says Skin to expand, select Envelope. Make sure the Vertices box is ticked and select Head from the bone section. The vertices assigned to the head bone will be colored in the routes:
http://www.tummyweb.com/files/3dsmax/35.PNG
C) In my case, they were not correctly assigned. We’ll have to assign them manually. This can be very tricky, you’ll have to be careful while doing this, unless you want your ped to move retarded in the game. Select the Select and Move tool, two tips before you start: If you have marked off one area, and want to mark another, but have already released your mouse button, you can hold CTRL to mark more without deselecting what’s already marked. If you want to deselect vertices, you can hold alt and mark what you want to deselect.
Okay, so, you have selected the Select and Move tool, you now need to “separate” the object’s vertices from the ped’s vertices by your eyes. The vertices that are NOT assigned to the head bone, are the blue ones, you need to find all the object’s blue vertices and assign them to the head bone. You do this by marking the vertices and clicking the up arrow of Abs. Effect within the Weight Properties, until it says “1,0”. When it says, click on “Paint Weights”:
http://www.tummyweb.com/files/3dsmax/36.PNG
My outcome: http://www.tummyweb.com/files/3dsmax/37.PNG
Exporting the ped
10. If you got this far, it’s time to export, you do this by expanding the export section in the window on the left side. Scroll a bit down and you’ll see Bones/Skin Export, click it and save it where you want it. Press CTRL + S for a final scene save, then exit 3ds Max.
http://www.tummyweb.com/files/3dsmax/38.PNG
http://www.tummyweb.com/files/3dsmax/39.PNG
11. Start TXD Workshop and select Open TXD, open your ped’s .txd. Since I’m having some trouble with the mask, I choose to duplicate the texture that’s already in there, and then importing the object’s image file over it. You can do this by clicking on the ped’s texture, and then pressing CTRL + Insert. Now select the duplicated version of the ped’s texture and click on Import. Import the image you used to texture in 3ds Max. Make sure it has the same name inside the .txd, you can change this by clicking on properties. In my case it should be named bandblue.
http://www.tummyweb.com/files/3dsmax/40.PNG
Import the new files into gta3.img with help of IMG Tool, don’t forget to rebuild the archive! (You don’t need to rebuild if you use Spark)
12. Test it in-game
http://www.tummyweb.com/files/3dsmax/41.png
Tutorial written by me
Edit: Made a video "guide": http://www.tummyweb.com/files/3dsmax/vid.wmv
Good luck : )
Je n'arrive pas le 4 mais je réessaye avec un autre Skin .
![Francesco[Major]Callogero](https://2img.net/u/1314/14/51/03/avatars/3437-28.jpg)
Francesco[Major]Callogero- Messages : 1093
Date d'inscription : 09/01/2010
 Re: |TUTO| TXD'WorkShop - PhotoFiltre
yeah merci beaucoup il faudrait trouver une verssion francaise ^^
\Leave/- Messages : 241
Date d'inscription : 30/06/2009
 Re: |TUTO| TXD'WorkShop - PhotoFiltre
Pour prendre ques les chaussures ou que la tête je me suis fait au logiciel, j'ai trouver ca :
Au lieu de prendre SOMMETS, tu prend ELEMENTS.
C'est comme ca que maintenant je peut me faire de beaux mix de skins
Au lieu de prendre SOMMETS, tu prend ELEMENTS.
C'est comme ca que maintenant je peut me faire de beaux mix de skins
Invité- Invité
 Re: |TUTO| TXD'WorkShop - PhotoFiltre
Karim Akram [Rim'K] a écrit:Quand j'modif une couleur etc.. après je le sauvegarde et j'importe le png après etc..
Je sauvegarde etc.. J'met avec imgtool, après j'commence a me co, sa me fait crash direct...
C'est quoi le problème?

GBA- Messages : 1105
Date d'inscription : 02/03/2009
 Re: |TUTO| TXD'WorkShop - PhotoFiltre
Avec txd workshop quand je lance le png en 32 bits, sa me met
tprogressbar property out or range
Je dois faire quoi ??!
tprogressbar property out or range
Je dois faire quoi ??!

Dave_Vuitton- Messages : 487
Date d'inscription : 18/03/2009
Age : 104

Dave_Vuitton- Messages : 487
Date d'inscription : 18/03/2009
Age : 104
 Re: |TUTO| TXD'WorkShop - PhotoFiltre
J'ai un problème, je suis exactement le tuto, mais quand je vais IG mon personnage est tout blanc, vous pouvez m'aider s'il vous plait?

N.W.A- Messages : 368
Date d'inscription : 24/05/2010
Page 1 sur 2 • 1, 2 
 Sujets similaires
» Recherche tuto txdworkshop
» [TUTO] ¤ Comment visualisez un skin / trouver le nom d'un skin ¤ [TUTO]
» [TUTORIEL] Modifier les couleurs d'un skin avec l'usage de Photofiltre.
» [Création] Photofiltre by' Jay
» Aide graphisme. [Photofiltre]
» [TUTO] ¤ Comment visualisez un skin / trouver le nom d'un skin ¤ [TUTO]
» [TUTORIEL] Modifier les couleurs d'un skin avec l'usage de Photofiltre.
» [Création] Photofiltre by' Jay
» Aide graphisme. [Photofiltre]
Forum CeMondeLeVotre Rôleplay — GTA:SAMP :: COMMUNAUTE: DISCUSSIONS DIVERSES :: Modding - Gta San Andreas :: Autres
Page 1 sur 2
Permission de ce forum:
Vous ne pouvez pas répondre aux sujets dans ce forum
